Want to build your own 24/7 FAQ knowledge base?
LibraryH3lp subscriptions
include unlimited independent internal or public-facing
knowledge bases.
Search the LibraryH3lp Knowledge Base
How do I create code to place in my web page?
11166 views | Last updated on Aug 20, 2025 chat widget
Use the Chat Snippets management page within the admin dashboard to get the embed code to cut and paste into your web page.
When you register a trial, you automatically get one queue, one chat box skin, and one chat snippet. If you have a simple chat service, you can simply reuse the same chat snippet on all of your web pages. However, if you have more than one queue or maybe want to use different chat skins on different pages, simply create more chat snippets as needed to realize your goal. Each trial/subscription includes unlimited queues, chat skins, and chat snippets, so please make what you need.
Once you have deployed the chat snippet embed code onto a web page, you can make changes to your chat snippet (chat box, online/offline appearance, proactive chat invitations, etc.) from within the Chat Snippets management page, without needing to modify the embed code on the web page.
Important note: Look for the following button at the top of of the page so you can get an in-place overview of how the dashboard page works:

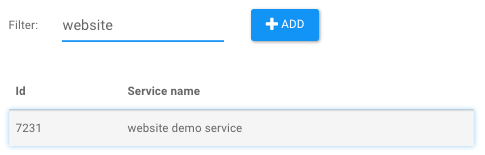
List of Chat Snippets (a. k. a. Services)
When you visit the Chat Snippets management page, you will see all of your chat services along with their embed code.
- Above the list, there is a filter field that lets you search the list by name or ID. The name is never shown to the guest and is only for your use as a description to help you remember why you created the chat snippet.
- Beside the filter field, there is an + Add button that lets you create a new chat snippet.
- You can click to select a chat snippet. Once selected, you can view the embed code or edit the settings.
Click any of the chat snippets in the list on the left of the page, to the right you'll see:
- An Edit and a Delete button for managing this chat snippet.
- The embed code to copy/paste into your web page.
- The chat box behavior in use by this snippet: embedded, pop-up, or follow-me
- Routing for incoming chats. If you have service rollover in place, the primary along with the rollover layers are shown.
- The chat box skin that will be displayed for each chat routing layer when that layer is online.
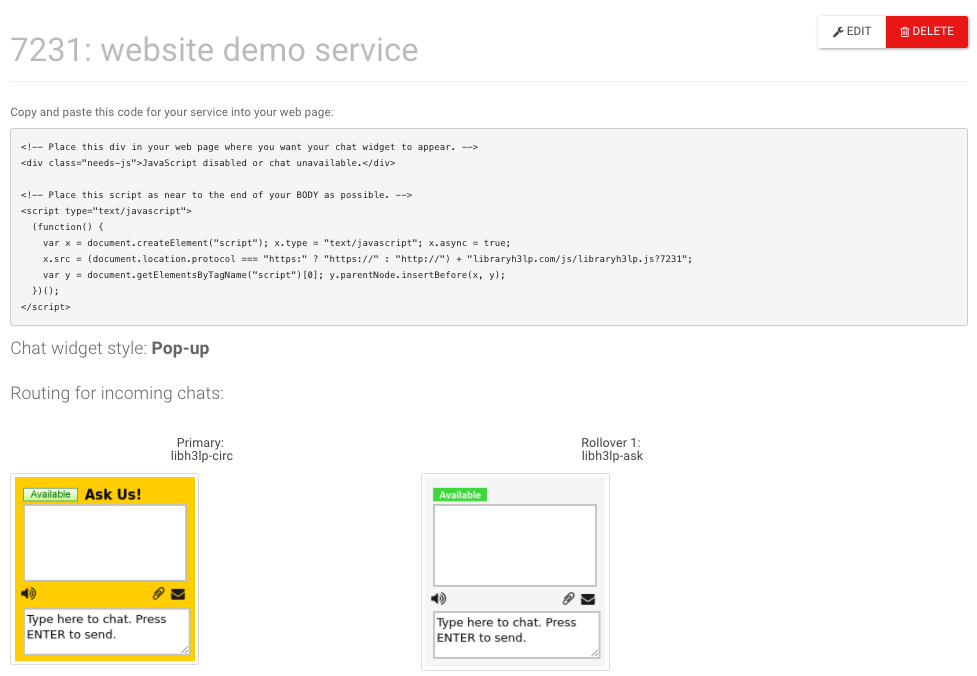
Look closely at the embed code for a chat snippet, and you'll see a number at the end of a line ending in libraryh3lp.js?XXXXX. That number matches your chat snippet ID. Pretty much all embed code looks identical except for that one tiny bit where the chat snippet ID is specified.
Chat snippet Edit page
Here's an overview of the Edit page from top to bottom:
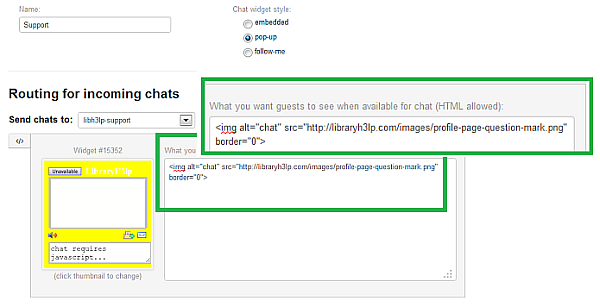
- Name: This is simply a description and can be anything you'd like. This name is never shown anywhere and serves as a handle to help you identify your service. For example, if you are placing a snippet on your home page you might name the snippet "Home Page."
- Chat widget style: Embedded, pop-up, or follow-me behaviors are available. If you change your mind and want a new behavior after installing the embed code on your web page, that is fine. All you have to do is update the chat widget style via the dashboard, click Save, and then reload your web page.
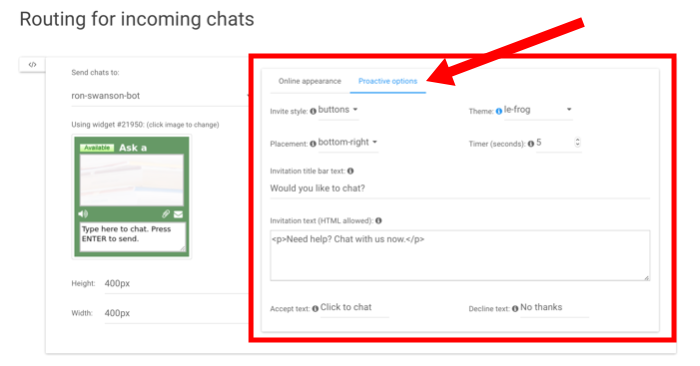
- Routing for incoming chats: You will have at least a Primary routing layer. If you opt to enable service rollover, you will have additional layers beyond the primary.
- Send chats to: This determines where incoming chats are routed. You can choose either from your queues or users. However please be aware chats sent to users instead of queues are treated as private conversations and are not logged in any way -- no chat metadata nor transcript storage. Chats to users also cannot be transferred. If you wish to route chats to an individual but want logging and transfer capabilities, create a queue in the Queues management page and assign only a single user to it.
- Using widget #XXX: This determines how the chat box will look to guests. The ID corresponds to one of the skins you have created in the Chat Skins management page. Click on the chat box image thumbnail to change skins.
- Online appearance: For pop-up and follow-me behaviors, you can use this area to provide HTML that determines how the chat looks to guests when chat is available. More details below.
- Proactive options: You can optionally enable timer-based proactive chat invitations for guests. More details below.
- Add Service Rollover: Click this button to add rollover layers beyond the original primary layer.
- Offline Appearance: This is what guests see when chat is not available. This area accepts HTML, including plain text, images, mailto: links, or even custom email forms. You can even leave this area blank to show nothing when chat is offline.
- Browser JavaScript disabled/Service error: This is what guests see if they do not have JavaScript enabled in their browser or failure scenarios such as network outages. This area accepts HTML.
Advanced service configuration page (optional)
You do advanced customizations per routing layer with the advanced code edit page. On this page, you can:
- Customize your chat code as desired. To use a queue outside your own account, change the Jabber ID and URL to reflect the desired queue name.
- You can set advanced options like custom profiles or widget language.
- You can also include content not directly associated with the chat box. For example, you could include a link to your chat policy statement, or your chat service hours, immediately before or after your chat box.
Launching Pop-Up or Follow-Me Chat Boxes
After selecting the desired chat widget style, use the area to the right of the widget thumbnail to supply what the guest will click on to launch chat. The default is a small piece of text, "Click to chat," but you can be much more creative.
To provide your own "We're online, click to chat with us!" image, use an IMG tag, like this:
<img alt="chat" src="http://my-site.edu/path-to/my-image-name.png" border="0">
Providing an image for a pop-up chat box
Configuring Proactive Chat Invitations
You've probably been on a website that not only includes a chat option on the page but also proactively invites you to chat after you've spent some time on the page. Love it or hate it, this technique can increase patron engagement (Zhang and Mayer, 2014).
Broken down, the four main components of a proactive chat invitation are:
- A presence (availability) check to make sure that your chat queue is online before prompting the guest to chat. After all, we don't want to risk annoying the guest if we're not online to help.
- A timer to control the amount of time that will elapse before the chat invitation is presented. Zhang and Mayer's paper reports success using three minutes - substantially longer than many commercial websites.
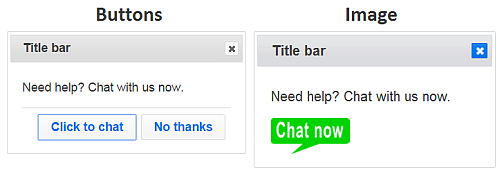
- A graphical dialog to control the appearance of the chat invitation. This part can be heavily customized, and we offer two different styles - a dialog with buttons and a dialog featuring a customizable chat invitation image. Plus there are many theme options for your proactive invitation.
- A cookie that is set when a guest declined the proactive chat invitation. After all, we don't want to risk annoying the guest if they are not interested in chat.
When editing any service level, look for the Proactive options tab which is next to the Online appearance tab, and you'll be able to craft your own proactive chat invitations without any additional hand coding.
Invitation Placement Note: If the proactive chat invitation is not appearing where you'd expect on your page given the the proactive settings, check the DOCTYPE for your web page. If not already present, add the following as the first line in your HTML file:
<!DOCTYPE html>
Theming Note: If your page already includes a stylesheet for jQueryUI (as with a LibGuide or with EBSCO), that styling will take precedence over the configured theme to avoid introducing any conflicts on your page.
FAQ URL:
More Help
Search By Topic
Stay Connected
