Want to build your own 24/7 FAQ knowledge base?
LibraryH3lp subscriptions
include unlimited independent internal or public-facing
knowledge bases.
Search the LibraryH3lp Knowledge Base
Can I give someone restricted administrative privileges for only part of my subscription (mini-admin)?
6485 views | Last updated on May 05, 2026 admin
Yes! You can set up users as "mini-admins" and restrict their administrative rights to only the assets contained within one or more folders in the overall subscription. A mini-admin can manage their own queues, users, chat skins, transcripts, etc, within the folder and the mini-admin cannot see any data (including transcripts) associated with any assets outside of that folder. However, any user with full administrative privileges will be able to see all of the data for assets in all folders, including the mini-admin's folder.
For example, if a campus library controls the subscription, the admissions department can designate one or more mini-admin users that will only be able to manage the chat service for the admissions department. The admissions department's mini-admin will not be able to see any data from the library. But the library will always be able to see the admissions department's data, since the library possesses at least one user account with full administrative privileges.
Building on our example scenario, all users and queues for the library and the admissions department will appear for transfers. This is beneficial if the departments often refer users to each other. However, this can be a little confusing if the service grows large. The best way to keep it purely beneficial and avoid confusion is to work out a naming convention for users and queues. That way, the transfer lists will be easy to understand. Example: library-pam, admissions-amy.
Pro Tip! Only users with full administrative privileges can create permissions groups within a subscription and designate users as mini-admins.
Creating a folder (and new user if needed)
The first step in setting up a mini-admin permissions group is to create a folder. Permissions for the mini-admin permissions group are granted on a per-folder basis.
1. Visit the beta version of the Users page of the admin dashboard (person icon) and create a new folder (US, CA, EU, SG).
Click the "MANAGE FOLDERS" button in the users search box at the top of the page:

In the "Manage folders" box that pops up, click the "CREATE NEW FOLDER" button:

Give your new folder a name. Then click the "SAVE" button to create the folder. Then click the "CLOSE" button to close the "Manage folders" box.

Pro Tip! In our example, we name our folder "example mini-admin folder". Your folder can be named anything you wish. We recommend using something meaningful to your staff like "Admissions Department".
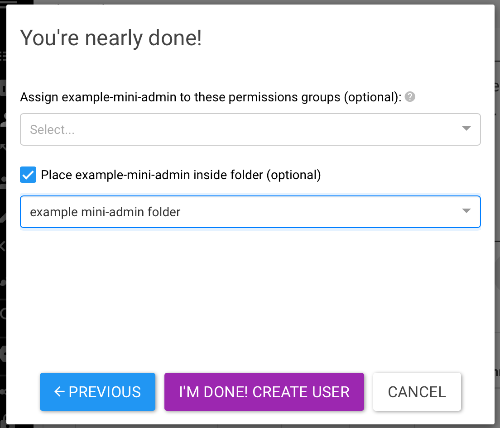
2. Add a new user within the folder.
Click the "+ CREATE NEW USER" button to launch the user wizard.

Follow the steps outlined in the wizard to create the new user account. On the last screen of the user wizard (titled "You're nearly done!"), place the new user inside the folder you created in Step 1. Then click the "I'M DONE! CREATE USER" button.
Pro Tip! Wait until mini-admin folder, user, and permissions group exist before generating additional assets like queues, chat box skins, FAQ sites, etc. We strongly recommend requiring the mini-admin user to create these additional assets to ensure that the mini-admin will have proper access to these assets. If instead a full administrator creates these assets, most likely the mini-admin will not have proper access to see or manage them.
Setting up a mini-admin permissions group
Once a folder for the mini-admin group exists and there's at least one user whom you wish to designate as a mini-admin, you are ready to create the mini-admin permissions group.
1. Visit the Permissions Groups page of the admin dashboard (padlock icon) (US, CA, EU, SG).
![]()
2. Create a new permissions group by clicking the purple "CREATE NEW GROUP" button.

In the screenshots below, we've named our permissions group "example mini-admin group". When you create the name for your permissions group, it can be whatever you wish. We recommend something meaningful to your staff like "Admissions mini-admins".
3. Add the user whom you wish to designate as a mini-admin as a member of the new mini-admin group in the membership area.

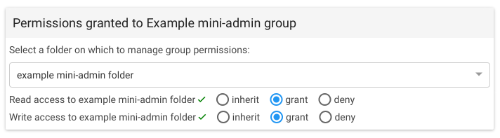
4. Select the folder to which you are granting the mini-admins permission. And grant that group read and write access to the folder.
FAQ URL:
More Help
Search By Topic
Stay Connected
