Want to build your own 24/7 FAQ knowledge base?
LibraryH3lp subscriptions
include unlimited independent internal or public-facing
knowledge bases.
Search the LibraryH3lp Knowledge Base
How do users see and chat with each other when staffing chat?
Users who are mutual chat contacts can see and chat with each other while staffing chat. Chat contacts are configured in the users management page of the administrative dashboard. (US, CA, EU, SG)
Pro Tip! After setting up contacts, all affected users will need a fresh login to synchronize the new contacts.
Below we cover two common use cases for setting up chat contacts.
Use Case 1: Creating a new user
When creating a new user via the wizard, one of the steps is to set up chat contacts for that user. By default, a new user will see all other users and queues within an account as contacts. But this can be customized within the wizard.
Use Case 2: Manage contacts for some/all existing users
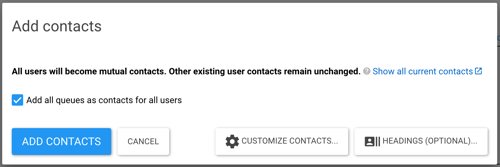
To update chat contacts for some or all existing users, use the checkboxes in the users management page to select users then click the "Manage chat contacts" button.

In the box that pops up, you can leave the checkbox for queues checked if you'd also like the users to see all queues as chat contacts.

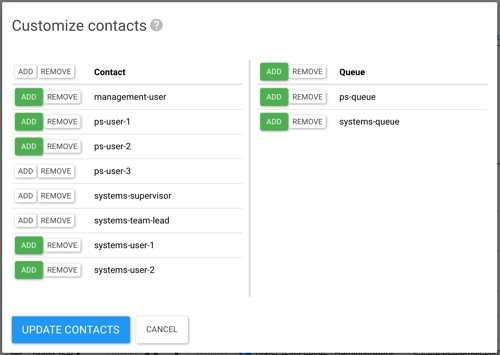
At this point you can click "Add Contacts" to set up your contacts and be done. However if you want to customize the contacts for the selected users, you can instead click "Customize contacts..." to access advanced features for setting up contacts. See the next section entitled "Advanced: Customize Contacts" for more information.
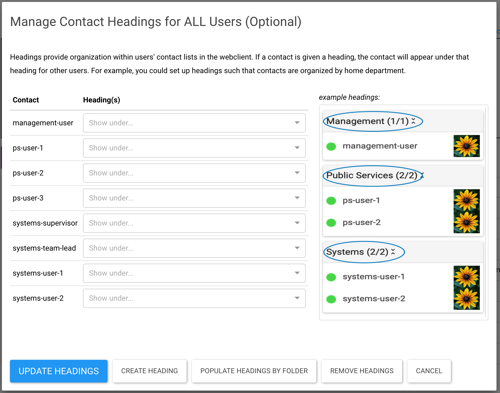
If you'd like to set up or manage contact headings, you can do that by clicking "Headings (optional)...". Headings provide organization within users' contact lists in the webclient. If a contact is given a heading, the contact will appear under that heading for other users. For example, you could set up headings such that contacts are organized by home department. See the section lower in this doc entitled "Advanced: Contact Headings" for more information.
Advanced: Customize Contacts
The default behavior of making all selected users mutual contacts may not be what you are after. For example, maybe you want to remove contacts instead of add contacts? That is what the customize screen is all about -- it provides fine-grained control over both adding and removing contacts from selected users.

If you happen to have any custom contact headings configured (see next section), these will also appear within customize contacts box. The screenshot above does not show any custom contact headings.
Advanced: Contact Headings for all users
When a user is staffing chat, that user will see other users under the "Contacts" chat group and queues under the "Queues" chat group. Guests always appear in the "LibraryH3lp" chat group.
Instead and if desired, you can create your own custom contact headings for user contacts. For example if you have a library and an admissions department sharing the same subscription, you might wish to have a heading for librarians and a heading for admissions staff rather than lumping everyone into the generic "Contacts" group.
You can create/remove headings button to make your custom headings and use the drop-down menu beside each user to assign that user to a heading.

As a convenience, there's a "Populate Headings By Folder" button since many times the name of the folder in which a user is filed tracks that user's department or function within the organization. This button lets you quickly populate the heading for each user with their folder.
If you have a large number of users and the populate headings by folder feature is not feasible, LibraryH3lp support can send you a spreadsheet of your users, which you can send back with your desired headings populated. Then, we can set up your headings as specified in the spreadsheet. Email support@libraryh3lp.com for assistance.
FAQ URL:
